Tuesday, December 14, 2010

12 Days of Christmas Cookies: Hermit Bars

These treats are named Hermit Bars because they can be "hermited" away and taste better when they are a few days old.  They have a chewy but firm texture and would be great to mail to loved ones far away this holiday season.  Mr. Sprinkles is not a big raisin fan so I substituted the same amount of semi-sweet chocolate chips.  Enjoy!

Hermit Bars
Makes 24 1" bars

  • 2 cups plus 2 tablespoons all-purpose flour
  • 2 teaspoons baking soda
  • 2 teaspoons ground ginger
  • 1 3/4 teaspoons ground cinnamon
  • 1 3/4 teaspoons ground cloves
  • 1/4 teaspoon salt
  • 1/2 cup (1 stick) plus 1 tablespoon unsalted butter, room temperature
  • 1 cup loosely packed light-brown sugar
  • 1 large egg, room temperature
  • 1/4 cup unsulfured molasses
  • 3/4 cup raisins or chocolate chips
  1. In a medium bowl, sift together flour, baking soda, ginger, cinnamon, cloves, and salt; set aside.
  2. In the bowl of an electric mixer fitted with the paddle attachment, cream the butter and brown sugar on medium speed until light and fluffy, about 2 minutes.  Add egg; beat until combined, scraping down the sides of the bowl once.
  3. Add molasses; beat until combined, and scrape down sides of the bowl.  Add the flour mixutre and raisins/chocolate chips; beat on low until dough just comes together, about 2 minute.  Cover with plastic wrap; place in refrigerator to chill 30 minutes or overnight.
  4. Preheat oven to 375 degrees.  Line a baking sheet with parchment paper; set aside.
  5. Remove dough from refrigerator, and turn out onto a clean work surface.  Divide into 2 equal pieces, and shape each piece into a 12 inch log about 1 1/2 inches in diameter.  Place on prepared baking sheet, at least 3 inches apart.
  6. Place in oven, and bake until logs are golden but still very soft to the touch, 20 to 22 minutes.  The logs will flatten out and lengthen and get slightly puffy in the center. Transfer baking sheet to a wire rack to cool completely.
  7. Slice logs into 1-inch-wide bars.  Hermit bars can be stored in an airtight container at room temperature up to 1 week.

Sunday, December 5, 2010

12 Days of Christmas Cookies: Mexican Hot Chocolate Cookies

While making a Whole Foods run, I came across this magazine.  While I'm not typically a huge fan of the author, you can see why I obviously had to buy this magazine. This link is to a site for a $1 off coupon for any of you interested in picking up the same magazine or stay tuned to this blog because I earmarked a zillion of these recipes to try. :)


I love to try the new and unexpected and this magazine definitely delivered on both accounts.  I was drooling over the yummy looking chocolate cookies on the cover and was excited to learn they involved chocolate and cayenne pepper.  I was nervous they'd be super spicy which thanks to my Austrian heritage, I'm so not used to, but the pepper and cinnamon they are rolled in gives them more of a spicy warmth that makes them taste like a cookie version of a cup of hot chocolate.  They were a huge hit at my school, at Mr. Sprinkle's workplace, and got a thumbs up from Sister Sprinkle who is a huge foodie.  Disfrutar!


Mexican Hot Chocolate Cookies
Makes about 3 dozen cookies

  • 2 1/4 cups all-purpose flour
  • 1/2 cup unsweetened cocoa powder
  • 2 teaspoons cream of tartar
  • 1 teaspoon baking soda
  • 1/2 teaspoon coarse salt 
  • 1 cup (2 sticks) unsalted butter, room temperature
  • 1 3/4 cups sugar
  • 2 large eggs
  • 2 teaspoons cinnamon
  • 1/2 teaspoon cayenne pepper OR ground chile such as chipotle/ancho/arbol

  1. Preheat oven to 400 degrees.
  2. In a medium bowl, sift together flour, cocoa powder, cream of tartar, baking soda, and salt. 
  3. In a large bowl, using an electric mixer, beat butter and 1 1/2 cups sugar (the other 1/4 is used for rolling) on medium speed until light and fluffy, about 2 minutes. 
  4. Scrape down side of bowl. Add eggs and beat to combine. With mixer on low, gradually add flour mixture and beat until combined. 
  5. In a small bowl, combine remaining 1/4 cup sugar, cinnamon, and cayenne pepper or chile powder. Using heaping tablespoons, form balls of dough and roll in cinnamon-pepper/chile-sugar mixture. 
  6. Place, about 3 inches apart, on parchment-lined baking sheets. Bake until cookies are set in center and begin to crack, about 10 minutes, rotating sheets halfway through. (Mr. Sprinkles hates crunchy cookies so I shorten the time to 9 minutes.)
  7. Let cookies cool on sheets on wire racks 5 minutes, then transfer cookies to racks to cool completely.

12 Days of Christmas Cookies: Lemon Snickerdoodles

Mr. Sprinkles is a HUGE fan of the snickerdoodle, so when I saw a lemon version I just knew I had to give it a try.  The end result is fresh, clean, chewy, lemony goodness and a new Mr. Sprinkles favorite.  You can roll them in traditional sanding sugar but I had some left over white/clear sanding sugar from the engagement ring cookies that I thought would add a nice crunch.  You could also substitute turbinado sugar (raw sugar) if you don't mind it's brown hue.  I'm going to try making these with Meyer lemons sometime.  If you try that before I do, be sure to let me know how they turn out.  I hope you enjoy them as much as he does!

Lemon Snickerdoodles
Makes 3 dozen
  • 1/2 cup (one stick) unsalted butter, room temperature
  • 1 cup granulated sugar
  • zest of two large lemons
  • 1 egg
  • 1 teaspoon vanilla
  • 1/4 teaspoon cream of tartar
  • 1/4 teaspoon baking soda (bicarbonate of soda)
  • 1 1/2 cup flour
  • 1/2 cup coarse/turbinado/sanding/granulated sugar for rolling
  1. Zest your lemons over your mixing bowl to capture any of the oils released. (Be careful to remove only the lemon's zest and not the bitter white pith. Blech!)
  2. Using a stand mixer with the paddle attachment (or hand beaters), cream together the butter, lemon zest and sugar on medium-high speed for several minutes until light and fluffy. Reduce speed to low and mix in the egg and vanilla. Add the cream of tartar and baking soda then the flour, mixing until it forms a uniform dough.
  3. Turn out the dough onto a piece of plastic wrap, form into a rectangle and wrap in plastic. Place the dough into the refrigerator and allow to chill for several hours or over night.
  4. When you're ready to roll and bake, pre-heat your oven to 375°F and line a baking sheet with parchment or silicone baking mats.
  5. Roll your dough into walnut sized balls (1 inch) and then roll each in a bowl of sugar.
  6. Arrange the balls on your pan, giving them plenty of room to spread. Pat them down slightly.
  7. Bake the cookies for 9 minutes (chewy) or 10 minutes (crunchy).  
  8. Remove from the pan and allow to cool completely on a wire rack.
     

12 Days of Christmas Cookies

Hey readers!  My goal for this month is to share with you 12 different cookie recipes for the holiday season.  Some will be new recipes and others are Sprinkle family tried and true favorites.  Wish me luck! :)

Thursday, November 4, 2010

Salted Caramel Cookies

I made these awhile back for a Labor Day party and they were a big hit...actually a super, huge, mega hit.  Sweet and salty, these cookies have it all!  I'm going to be making them for Thanksgiving this year at my Mom's per her request and thought I'd post the recipe for any of you who'd like to do the same.

As a warning, these aren't the easiest cookie to make.  They are however, worth every minute of work.  They are time consuming but the cookie bases can be made in advance and frozen until you need them.  I used jarred dulce de leche for the fillings rather than attempt potentially explosive sugar mixtures on my own.  Lastly, when it comes to the cookie bases, the refrigerator is your best friend!  Enjoy!


Salted Caramel Cookies
adapted from a recipe by More Magazine

Makes 28 cookies
  • 1 cup (2 sticks) unsalted butter, room temperature
  • ½ cup granulated sugar
  • ¼ teaspoon fine salt
  • 1 large egg
  • 1 teaspoon vanilla extract
  • 2½ cups all-purpose flour
  • ½ cup jarred dulce de leche or other thick caramel filling
  • Coarse sea salt for sprinkling ( I used regular old sea salt and stayed away from the smoked and flavored varieties)
1. Preheat the oven to 350°. With a mixer, cream together butter, sugar and salt until fluffy and light, 2 to 3 minutes.

2. Beat in egg and vanilla. Add flour, and mix until just incorporated. Divide dough into two equal balls. Flatten into disks, wrap in plastic wrap, and chill until firm, about 1 hour.

3. Generously flour a sheet of parchment paper. Place one disk in center, and dust the top and a rolling pin with flour. Working quickly, roll dough into a thickness just shy of a quarter inch. Slide onto baking sheet, and chill again. Do not skip this step - trust me.  Repeat process with second ball of dough.

4. I used two fluted, round cookie cutters: 1 larger (about 1½ inches) and 1 smaller (about 1 inch). Flour both cookie cutters and using the larger cutter, cut half of the dough for the bottoms of the cookies. Lift off excess dough to chill, and reroll for more cookies. Re-chill cut cookie bottoms.

5. For cookie tops, use the large cutter on the second half of dough. Then, using the smaller cutter, place in the center of each top to form a hole for the caramel to show through. Re-chill.

6. Line a baking sheet with parchment, and place cookies 1 inch apart. Bake 9 to 11 minutes, rotating after 5 minutes, until just set. Do not brown.

7. Transfer cookies to a rack, and let cool completely. Spread bottom cookies with caramel. Cover with tops. Sprinkle the caramel with sea salt.

Saturday, October 30, 2010

Chewy Gingersnaps

Whenever the weather turns cold, these are one of my favorite go to cookies.  I think these cookies are so perfect for fall and make the house smell wonderful.  I started making these the year we got married and they quickly became one of Mr. Sprinkle's favorites.  They're one of mine too because they're super easy to make and have the same taste as a gingersnap but without the consistency of hardtack.   They're delicious by themselves or sturdy enough to be dunked in a glass of milk.  They only baking tips I have for these treats is not to flatten them too much or you'll wind up with flat disks instead of chewy cookies.  They really only need to be flattened enough to keep them from rolling away.  Also, the hubby prefers them baked for only 8 minutes.  Enjoy!

Katie's Chewy Ginger Snaps
Makes 2 dozen
  • 2 1/4 cups all-purpose flour
  • 2 teaspoons ground ginger
  • 1 teaspoon baking soda
  • 3/4 teaspoon ground cinnamon
  • 1/2 teaspoon ground cloves
  • 1/4 teaspoon salt
  • 3/4 cup butter, softened
  • 1 cup sugar
  • 1 egg
  • 1 tablespoon water
  • 1/4 cup molasses
  • additional sugar for rolling
  1. Preheat oven to 350 degrees F. 
  2. Sift together the flour, ginger, baking soda, cinnamon, cloves, and salt. Set aside.
  3. In a large bowl, cream together the butter and 1 cup sugar until light and fluffy. Beat in the egg, then stir in the water and molasses. Gradually stir the sifted ingredients into the molasses mixture. 
  4. Shape dough into walnut sized balls, and roll them in sugar. Place the cookies 2 inches apart onto an ungreased cookie sheet, and flatten slightly.
  5. Bake for 8 to 10 minutes in the preheated oven. Allow cookies to cool on baking sheet for 5 minutes before removing to a wire rack to cool completely.

Wednesday, October 6, 2010

Katie's Brownie Cookies

These cookies have become one of my signature baked goods.  They're one part cookie, one part cake, one part brownie, and all chocolatey goodness.  They have only a few ingredients and are fairly easy to make.  The only downsides are that the dough is VERY sticky and I always wind up covered in powdered sugar but I'm pretty sure that may be a result of my super klutziness.  I've been tempted to make an apron covered with molecules associated with baking but the idea of paint pens really scares me.  Maybe I can get some tips from my crafty friend Megan. To save you the frustration I suffered, just accept that there is no getting around the minimum 2 hour refrigeration time (overnight is best). Also, it helps to put the remaining dough back in the fridge during baking.  I often times get the hubby to help and have him roll the cookies in powdered sugar after I rolled them into 1 inch balls as they warm up in your hands and get super messy.  The payoff is that everyone seems to LOVE, LOVE, LOVE these cookies!  Seriously, multiple marriage proposals have been extended after eating these cookies.  Enjoy!


Katie's Brownie Cookies
Makes 2 dozen
  • 8 oz brick of cream cheese
  • 1 stick of butter
  • 1 egg
  • 1 tsp. vanilla
  • 1 box Betty Crocker Moist Fudge Cake Mix 
  • powdered sugar
Cream together the cream cheese and butter.  Add in the egg and vanilla.  Slowly mix in the cake mix.  The dough will be VERY sticky.  Refrigerate for at least 2 hours.  Roll into 1 inch balls and roll in powdered sugar.  Bake at 350 degrees for 12 minutes. 

Monday, September 20, 2010

The BEST Pumpkin Bread

Yes, that's right,  it's the BEST pumpkin bread.  Last year a student and her mom baked loaves of pumpkin bread for my team of teachers.  Typically, teachers never consume student created food for fear of accidental or intentional poisoning.  After a long day of smelling this delicious bread and dealing with parent teacher conferences...we caved.  We said a fond farewell to our loved ones (just in case) and ate it.  It was AMAZING!  It's moist, not too pumpkiny, and has this amazing cinnamon brown sugar crust.  Make it yourself and enjoy it without fear of death. :)  I baked this bread to take to work this weekend and took a picture of the bread in my new stoneware bread pans.  I planned on taking a picture of the remaining loaf when I got home but found some little mouse had eaten half of it. I'm looking in your direction Mr. Sprinkles...


The Best Pumpkin Bread
2 loaves or 4 mini loaves

Bread:
  • 3 1/2 cups of flour
  • 3 cups of sugar
  • 2 tsp baking soda
  • 1/2 tsp baking powder
  • 2 tsp salt
  • 1 tsp nutmeg
  • 1 tsp cinnamon
  • 1 cup nuts (optional, I omit these)
  • 4 eggs beaten
  • 2/3 cup water
  • 1 15oz can of pumpkin
  • 1 cup vegetable oil
Topping:
  • 2/3 cup brown sugar
  • 1 tsp cinnamon
1. Mix wet ingredients.
2. Mix dry ingredients.
3. Gradually add dry ingredients into wet ingredients.
4. Pour into 2 greased loaf pans or 4 mini loaf pans.
5. Sprinkle with topping.
6. Bake for 1 hour at 350 degrees for 2 loaf pans (45 minutes for mini loaf pans).

Sunday, September 19, 2010

Sugar Cookies for Diane's Shower

My wonderful friend, Diane, who works with me at both of my jobs was recently engaged.  For the last show of our concert season we threw a potluck feast to celebrate.  I thought it was the perfect opportunity to use my engagement ring shaped cookie cutter.  I used white icing for the diamonds topped with clear sanding sugar and used black gel coloring to tint the remaining icing grey for the bands.  Often these sugar cookies look really pretty but are rock hard and flavorless.  Here is my tried and true recipe for chewy and flavorful sugar cookies.


Sugar Cookie Dough
Makes about 2 dozen
  • 2 cups all-purpose flour
  • 1/4 teaspoon salt
  • 1/2 teaspoon baking powder
  • 1/2 cup (1 stick) unsalted butter
  • 1 cup sugar
  • 1 large egg, lightly beaten
  • 2 tablespoons brandy, or milk
  • 1/2 teaspoon pure vanilla extract
  1. Whisk together flour, salt, and baking powder in a medium bowl; set aside. In the bowl of an electric mixer fitted with the paddle attachment, cream butter and sugar; mix until light and fluffy. With mixer running, add egg, brandy, and vanilla; mix until well combined. With the mixer on low, slowly add reserved flour mixture. Mix until just combined.
  2. Transfer dough to a work surface. Shape into 2 discs, cover with plastic wrap, and refrigerate for at least 1 hour.
  3. Preheat oven to 350 degrees. Line baking sheets with nonstick baking mats or parchment paper; set aside.
  4. On a lightly floured work surface, roll out dough to 1/8-inch thickness. Cut into desired shapes, and transfer to prepared baking sheets, leaving an inch in between. Leftover dough can be rolled and cut once more. Bake until lightly golden, about 10 minutes; do not allow to brown. Transfer to wire racks to cool.
  5. Decorate with Royal Icing, optional.
Makes about 3 cups
  • 4 cups confectioners' sugar
  • 3 tablespoons meringue powder (found at specialty stores or Michael's)
  • 1/2 teaspoon vanilla extract (you can use any flavor you'd like)
  • 1/2 - 3/4 cup warm water
  • Food coloring (optional)
  1. In the bowl of your electric mixer (or with a hand mixer), beat the confectioners' sugar and meringue powder until combined.  
  2. Add the water and beat on medium to high speed until very glossy and stiff peaks form (5 to 7 minutes). If necessary, to get the right consistency, add more powdered sugar or water. To cover or 'flood' the entire surface of the cookie with icing, the proper consistency is when you lift the beater, the ribbon of icing that falls back into the bowl remains on the surface of the icing for a few seconds before disappearing.
  3. The icing needs to be used immediately or transferred to an airtight container as royal icing hardens when exposed to air. Cover with plastic wrap when not in use.

Monday, September 13, 2010

Strawberry Freezer Jam

I saw a posting on Not So Humble Pie for jam made in the freezer.  I've always wanted to try making my own jam.  A bit of a strange aspiration I realize, but it's something I've been wanting to do for awhile but was a bit intimidated by the whole canning process.  Freezer jam sounded easy and fool proof so I gave it a whirl with some strawberries that were on sale at my local grocery store.  The end result was a pretty easily crafted but very sweet jam.  I wanted to reduce the sugar but the recipe said altering it could cause issues with consistency.  Sure Jell makes a low sugar pectin that I'll definitely try next time as it reduces the sugar by 1 cup.  I like to use strawberry or raspberry jam in a brownie recipe that I make and think it will be pretty yummy in that recipe.   I did a double batch of the recipe below and filled up 7 of these 2 cup jars.


Sure Jell Freezer Jam
  • 2 cups crushed fresh strawberries
  • 4 cups sugar
  • 1 (1.75 ounce) package dry pectin
  • 3/4 cup water
  1. Mix crushed strawberries with sugar, and let stand for 10 minutes. Meanwhile, stir the pectin into the water in a small saucepan. Bring to a boil over medium-high heat, and boil for 1 minute. Stir the boiling water into the strawberries. Allow to stand for 3 minutes before pouring into jars or other storage containers.
  2. Place tops on the containers, and leave for 24 hours. Place into freezer, and store frozen until ready to use. 
  3. Use jam within 30 days of opening.

Thursday, September 9, 2010

Science Rockstar!

One of the only things I love more than baking is my job... 8th grade science teacher.  Yes, you read that correctly.  I LOVE teaching middle school science.  Recently, I applied for MSI Chicago's Month at the Museum program.  I filled out an application, wrote an essay, took a head shot, and created (with help) a 60 second DVD.  In the end I didn't make the semi-finalist cut but got an email from MSI today telling me that my video would be featured on MSI's facebook, twitter, and youtube account.  I shrieked like the middle school girls I teach and danced around my classroom.  Thank goodness I got the email after the kiddos left for the day! :)  So here it is...My Science Rockstar Moment!

Monday, August 30, 2010

Peanut Butter Chocolate Chip Cookies

I have a serious love of peanut butter.  I printed out this recipe from all recipes awhile ago and had a friend leave a few jars of peanut butter behind when he moved out of state I decided to try them out.  The end result was delicious chewy peanut buttery chocolatey goodness.  They were quite the hit at work and gone within the first 2 hours of my shift.  Hope you like them!


Peanut Butter Cookies from Heaven (Makes 3 dozen cookies)
1 C butter
1 1/2 C packed light brown sugar
2 eggs
1 C peanut butter
1 tsp vanilla extract
2 3/4 C all-purpose flour
1 1/4 C cornstarch
3/4 tsp salt
1 tsp baking soda
1/2 tsp baking powder
1 C semi-sweet chocolate chips

Preheat oven to 350 degrees.  Cream together butter and brown sugar.  Beat in eggs, peanut butter, and vanilla.  Mix together flour, cornstarch, salt, baking soda, and baking powder.  Combine wet and dry ingredients. Stir in chocolate chips.  Roll 1 tsp sized balls, place onto ungreased cookie sheet (I lined mine with parchment paper), flatten slightly, and bake for 10 minutes.


Monday, August 23, 2010

Bananas for Banana Bread

I heard about chocolate chip banana bread from a friend and decided try out a recipe because I LOVE bananas and chocolate.  I doubled the recipe and brought half to the concert venue this weekend (it was a hit) and froze the other half to bring into school this week.  This recipe was pretty delicious but I added an extra banana to the recipe because I really love a strong banana flavor and used butter flavored shortening because it's what I already had on hand.  I baked it in metal loaf pans and found they browned VERY quickly so I'd recommend tenting them with foil.  I splurged on a stoneware loaf pan yesterday so I'll be curious to see how that affects the breads that I bake.


Katie's Chocolate Chip Banana Bread (adapted from: All Recipes)

Makes 1 loaf

1 cup sugar
1/2 cup butter flavored shortening
2 eggs
2 tsp. vanilla
3 bananas mashed
2 cups all purpose flour
1 tsp. baking soda
1/2 tsp. salt
1 cup semi-sweet chocolate chips

In a mixing bowl, cream sugar and shortening. Beat in eggs, vanilla and bananas until thoroughly blended. Combine flour, baking soda and salt; add to creamed mixture and stir just until combined. Fold in chocolate chips. Spoon into a greased loaf pan and tent with foil. Bake at 350 degrees F for 60-70 minutes or until the bread tests done with a wooden pick. Cool in pan for 10 minutes before removing to a wire rack to cool completely. 

Sunday, August 22, 2010

Smells like *team* spirit!

I'm a true believer in not buying anything that I think I can make myself so when I saw a cute headband online for the Colts, I knew I had to make up a Bears version for my football loving sister.  My sister and her hubby are die hard football fans.  He plays for the CPD Enforcers and they have season tickets to the Bears.  So I purchased a few squares of glittery felt (orange, blue, and white), a few plastic headbands, 1 inch glitter foam letters, and rounded up some tacky fabric glue, and my glue gun.


I staggered the letters on the blue felt and added some tacky glue to the letters to ensure they wouldn't fall off during any tailgating festivities. I cut around the letters leaving a 1/8 inch border of blue then glued it to the orange felt and did the same.  After the glue was dried I hot glued the design to a headband that would blend in with my sister's dark brown hair.


The foam letters came in a set with red, blue, gold, and white letters so I made up a matching set for my Notre Dame loving best friend Christine (Memories By Christine) and her daughter.


I got a little inspired and printed out a 4 inch Bears logo on my computer and traced the parts onto the glitter felt, glued them with tacky glue, and attached it to a headband with hot glue.  One of these will also be mailed out to my good friend Megan (Sprinkles of Creativity) this week.


I then had to make one for myself and since I prefer the Cubs I recreated their "bear and bat" logo out of white glitter foam and backed it with left over blue glitter felt.  It was a HUGE pain trying to cut the bear out of the foam but I managed to make two so my friend Sandy could have one to wear when she visits the place of her recent engagement...Wrigley Field!

Friday, August 20, 2010

Have a Coke (cupcake) and smile!

I've made the classic Coke cake before, but when I found out the box office manager at the concert venue where I work in the summers was a Cherry Coke addict I knew I had to try the Coke cake with the cherry version of the soda.  I've tried regular, diet, and vanilla and the cherry version is by far my favorite.  It may sound kind of odd but it makes a delicious, moist, chocolate cupcake with just a hint of Coke flavor.

I followed the recipe below for the cake and the "frosting," baked the cakes in foil cupcake liners, and topped them off with little cola bottle gummy candies.  I put frosting in quotes because it's more of a glaze and can be rather tricky to work with if you don't let it cool enough before trying to use it or wait too long because it sets.

Finished cupcake.  I wish I remembered to take a picture before I took the best looking cupcakes to work.  Oh well. :)


Here's the recipe:

Cupcakes (makes 24 regular cupcakes):

2 cups sugar
2 cups all-purpose flour
1 1/2 cups small marshmallows
1/2 cup butter or margarine
1/2 cup vegetable oil
3 tablespoons cocoa
1 cup Cherry Coca-Cola
1 teaspoon baking soda
1/2 cup buttermilk
2 eggs
1 teaspoon vanilla extract

Preheat oven to 350 degrees. Prepare cupcake tin with liners.

In a bowl, sift sugar and flour. Add marshmallows. In saucepan, mix butter, oil, cocoa, and Coca-Cola. Bring to a boil and pour over dry ingredients; blend well. Dissolve baking soda in buttermilk just before adding to batter along with eggs and vanilla extract, mixing well. Pour into a lined cupcake pan.  I use an ice cream scooper to do this because it seems to fill them the exact amount and keeps them pretty uniform in size.  Bake for 20 minutes, remove from oven, let cool, "frost" and top with a cola bottle gummy. 

"Frosting":
1/2 cup butter
3 tablespoons cocoa
6 tablespoons Cherry Coca-Cola
2 Cups confectioners' sugar
1 teaspoon vanilla extract

For frosting, combine butter, cocoa and Coca-Cola in a saucepan. Bring to a boil and pour over confectioners' sugar, blending well. Add vanilla extract and pecans. Spread over cupcakes. Serve with a Coke!

Wednesday, August 18, 2010

First Ever Blog!!!

So this is it!  Here it is!  My first ever blog!  I've been getting my craft on lately by baking, bejeweling, hot gluing, and in various other medium.  My wonderful college buddy and sorority sister, Megan (Sprinkles of Creativity), suggested I start my own blog to share my craftiness.   Of all the people I've kinda lost touch with post-college years, she's one of the ones I miss the most and I've been very inspired by reading her page and some of the great baking blogs she recommended to me.  I hope my little addition to cyberspace will do the same to the people that read it.


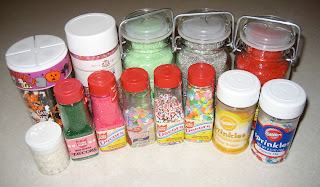
So here it is!  I wanted a clever name that would be easy to remember without giving away any of my personal information like my last name or specific location.  After much deliberation, I named my blog "Don't Forget the Sprinkles" in homage to the amazingly talented Megan and after my absolute favorite baking ingredient...sprinkles!  I looked through my cabinets and found an embarrassing number of sprinkles.  Monochromatic sprinkles, rainbow sprinkles, sugar sprinkles, candy sprinkles, snowflake sprinkles, Halloween sprinkles...  Those who know me well will be shocked to discover that despite my large sprinkle collection, I don't have any purple sprinkles at all!  Sprinkles are easily my favorite ingredient because I love how they can take a regular cupcake and make it magical or turn regular ice cream into a sundae.  They're that little bit of magic in every day life that I think we all need.  I hope you find a little bit of magical inspiration here. :)